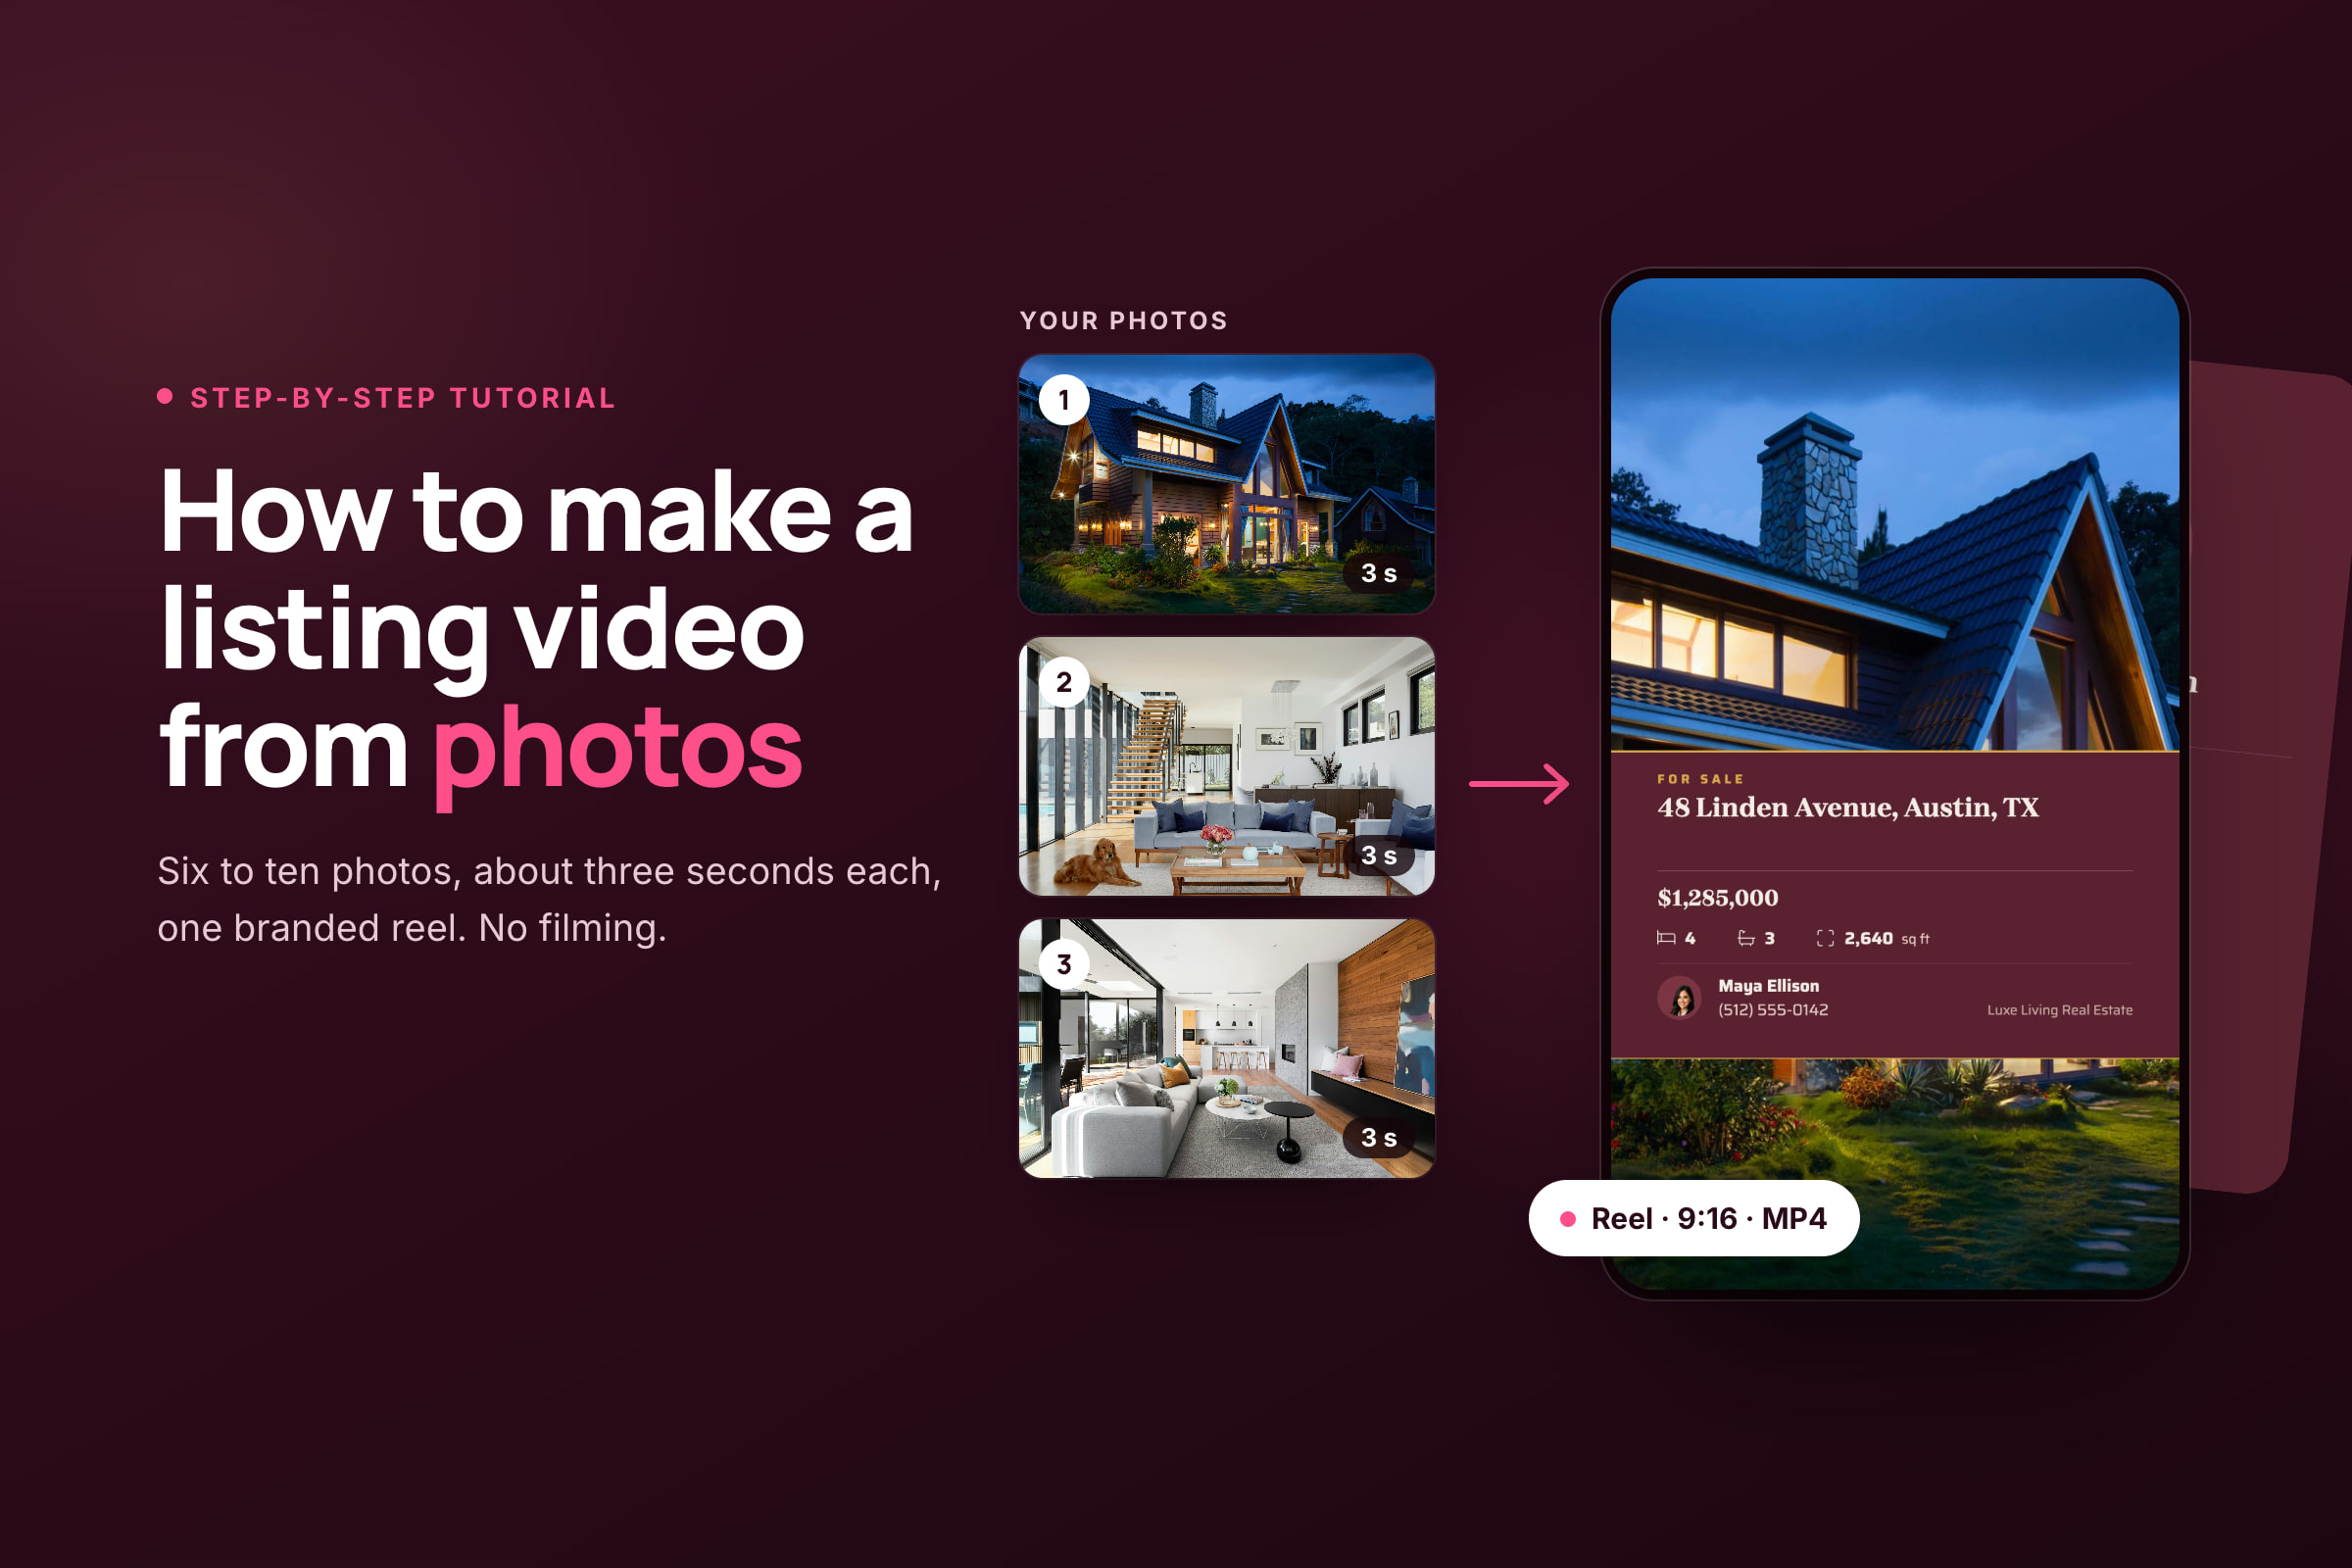
To make a listing video from photos, pick 6 to 10 of your best listing photos, put them in walk-through order, and give each about three seconds with a slow zoom or pan. Put the price and address on the opening shot and your contact card at the end, add music licensed for business use, and export a vertical 9:16 version for Reels and TikTok.
You don't need to film anything. The photos you already have are enough. What takes the time is repetition: cropping each photo, retyping the listing details, rebuilding your end card and uploading to each app. This guide covers the eight steps, how long the video should be, the rights and rules to check before you post, and how to hand the repetitive part to a tool. For what makes a listing video work once it's on Instagram, read our guide to Instagram Reels for listings.
Where the time goes when you make a listing video
A listing video from photos isn't hard to make. It's slow, because the same small jobs repeat for every photo, every channel and every listing. Here's the work, counted as tasks.
| By hand | With a tool that builds from the listing |
|---|---|
| Download the listing photos | Pick the listing; its photos are already there |
| Choose the photos and put them in order | Tap the photos in the order you want |
| Crop each photo to 9:16 | Photos fill the frame automatically, with a blurred-background option for the ones that don't crop well |
| Add a zoom or pan to each photo | Motion on every scene, varied automatically |
| Type the price, address and beds onto the opening shot | Filled in from the listing by the overlay you choose |
| Build a branded end card | Filled in from your saved brand and contact details |
| Find music you're allowed to use for business | Pick a track, or set a default once |
| Export, then export again for 16:9 | One render per shape, for the channels you picked |
| Write a caption for each channel | Review a drafted caption |
| Upload to each app, one at a time | Schedule once to every channel |
By hand, that's ten tasks for every video. With a tool, it comes down to five: pick the listing and where it goes, tap the photos, choose the look, check the result and schedule it. The five that are left are the ones that need you: choosing, checking and approving. The same saving repeats for every listing and every stage you post a video for, from Just Listed to Just Sold.
What you need before you start
- Your listing photos, and the right to use them in a video. Check your photographer's license (more on this below).
- The listing details: price, address, beds, baths and square footage.
- Your brand: headshot, logo, brokerage name, phone, and your license number if your state requires it on ads.
- Music you're allowed to use for business, from a licensed library or the platform's commercial library.
- The channels you'll post to, so you know which shapes to make.
How to make a listing video from photos in 8 steps
These steps work in any video tool. Where a step has a rule behind it, it's linked.
1. Choose 6 to 10 photos
Start with your strongest shot: the view, the kitchen, the pool, or the front of the house at dusk. That's the photo people see before they decide whether to keep watching. Then pick wide shots of the main rooms over tight shots of small ones, and drop near-duplicates. Two photos of the same living room from slightly different angles look like a stutter in a video.
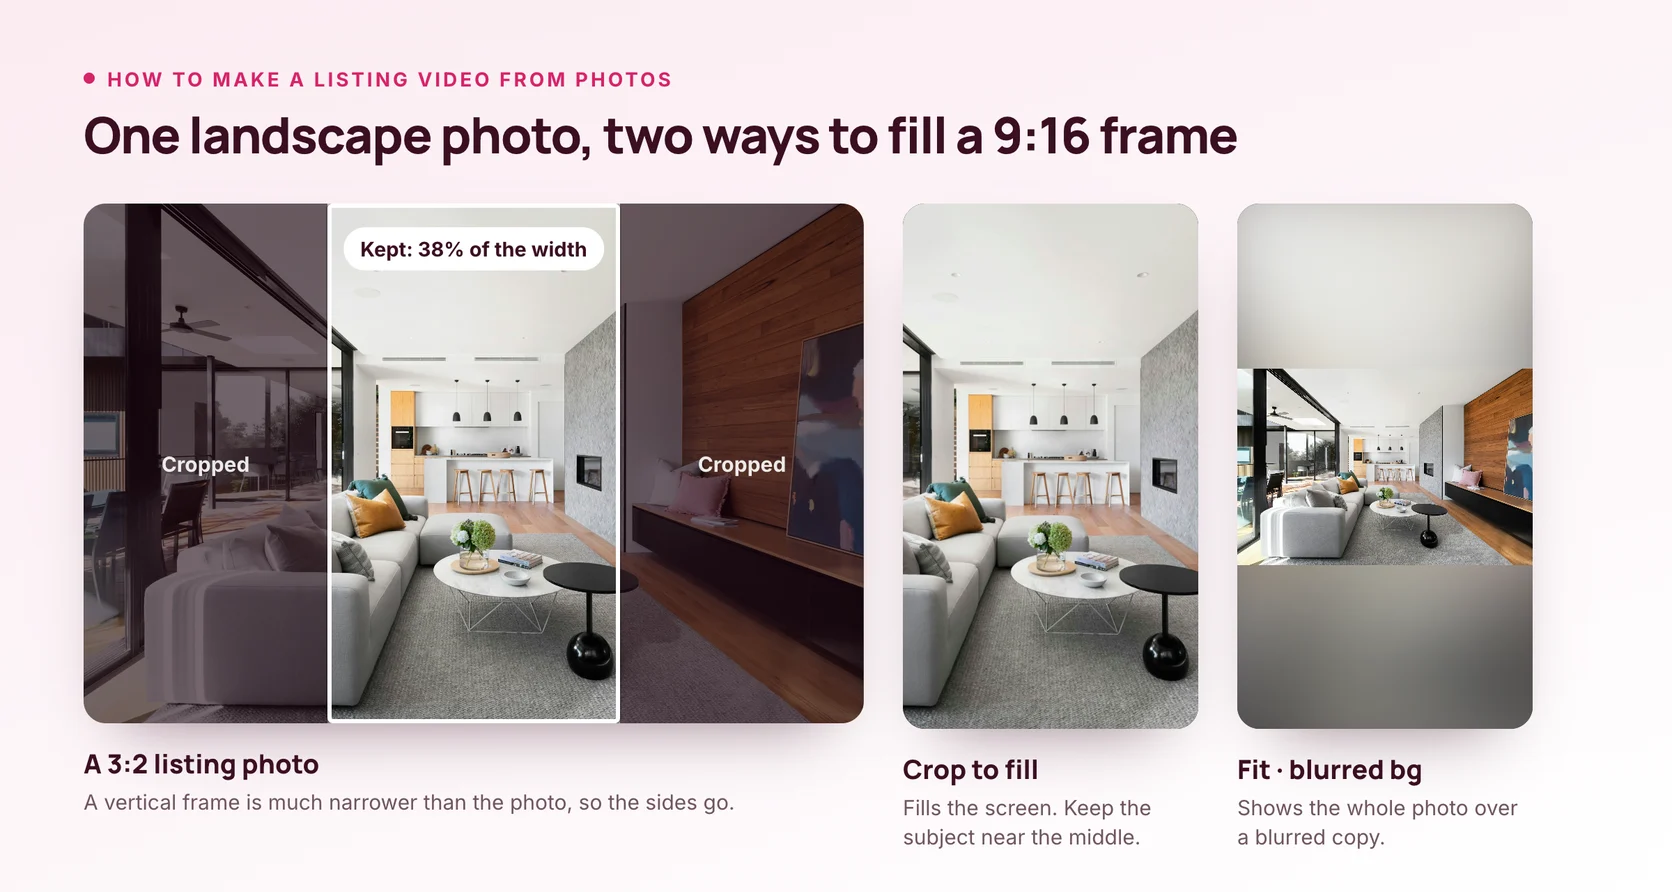
Most listing photos are landscape, and a vertical 9:16 frame keeps only part of them. Cropped to fill the frame, a 3:2 photo keeps about 38% of its width and a 4:3 photo about 42%. Choose photos whose subject sits near the middle, or show the whole photo over a blurred background instead of cropping it.
2. Put them in walk-through order
After the opening shot, move through the home the way a buyer would: the front of the house, the living space, the kitchen, the primary suite, then the outdoor space. End on the shot that makes people picture living there, such as the terrace at sunset or the view from the bedroom. A predictable order keeps viewers oriented, and the strong last shot gives them a reason to reach your contact card.
3. Pick the shape for each channel
Make a vertical 9:16 version for Instagram Reels, TikTok, Facebook Reels and Threads. Make a landscape 16:9 version for your website, email, YouTube and anywhere the video plays inside a wider page.
Both shapes work on the platforms that matter most. Instagram accepts reels between 1.91:1 and 9:16, at 30 frames per second or more and at least 720 pixels. Facebook has shared every video as a reel since June 2025, in any length or orientation. Vertical fills the whole phone screen, though, so make it your main version.
4. Set the pacing and motion
Give each photo about three seconds. Much shorter and viewers can't take in the room; much longer and a still photo starts to feel like a slideshow. Add a slow zoom or pan to every photo, and don't use the same move twice in a row: a zoom in, then a pan left, then a zoom out keeps the eye moving. Use a short crossfade between scenes rather than flashy transitions, which draw attention away from the home.
5. Put the key facts on screen
Many people watch with the sound off, so anything that matters has to be on screen. Put the price, address and beds and baths on the opening shot, then keep later text to one short line per scene, or none. Keep all text away from the bottom and right edges of a vertical video, where the caption and buttons cover it.
Check every figure against the listing. A wrong price in a video is harder to fix than a wrong caption, because you have to delete the post and make the video again.
6. End on a branded contact card
Finish with a card that shows your name, brokerage, phone number and one next step, such as "DM to book a showing" or "Open house Saturday 1–3 p.m." Include your firm's name: NAR's Code of Ethics requires it when you advertise listed property in any medium, and some states also require your license number. Our real estate social media compliance guide lists the state rules.
7. Add music you're allowed to use for business
Trending songs are usually off the table for business accounts. Instagram's licensed music library is for personal, non-commercial use, and some business accounts can't use it at all. Its Sound Collection is royalty free and can be used commercially. On TikTok, business accounts see only Commercial Sounds. Facebook's music guidelines prohibit commercial use of music without the right licenses, and may mute or remove the video.
So use a track from a library licensed for commercial use and keep proof of the license, or, if you post from the app itself, add the platform's commercial audio there. Pick instrumental music that fits the home, and let it fade out on the end card.
8. Review it, then post it with a caption
Before you post, watch the whole video once and check:
- the price, address, beds and baths against the listing
- the spelling of every word on screen
- that no crop cuts off something that matters, such as the top of a window or half of a sofa
- the end card: your name, phone, brokerage and license number
- the listing's current status, so a "Just Listed" video doesn't go out after it's under contract
Then write a caption that adds something the video didn't show, such as the school district, the lot size or the open house time. Put hashtags or a link in a first comment if you like.
How many photos, and how long should a listing video be?
At three seconds a photo, with a three-second end card and short crossfades (half a second for a reel, 0.8 seconds for a landscape video), the length works out like this:
| Photos | 9:16 reel | 16:9 video |
|---|---|---|
| 3 | 10.5 seconds | 9.6 seconds |
| 6 | 18 seconds | 16 seconds |
| 8 | 23 seconds | 20.6 seconds |
| 10 | 28 seconds | 25 seconds |
| 15 | — | 36 seconds |
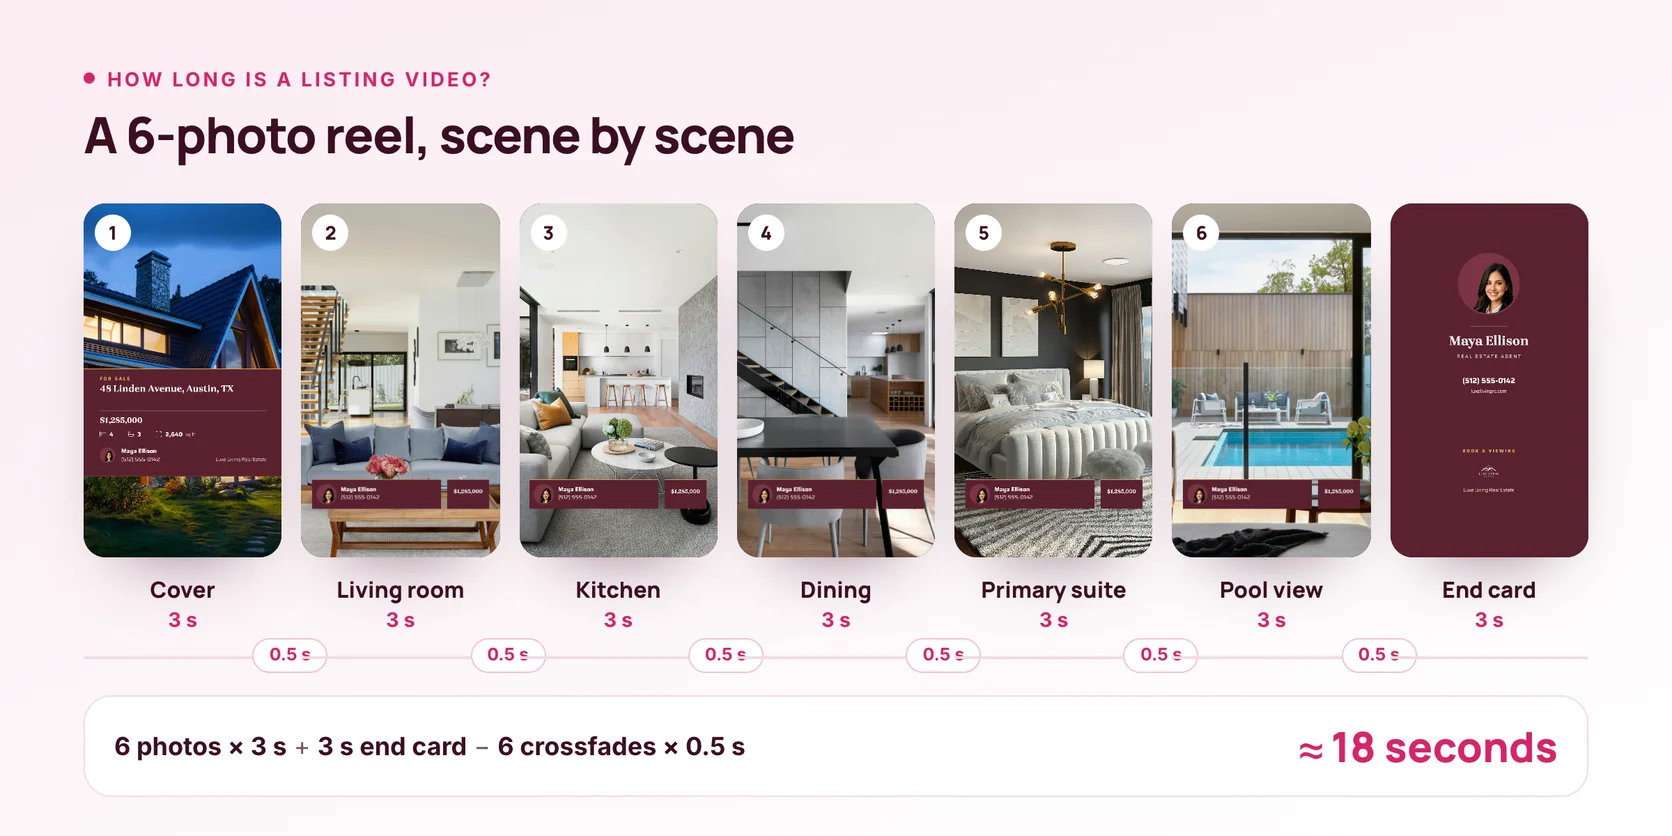
Each extra photo adds about two and a half seconds to a reel. For Reels and TikTok, 6 to 8 photos is a good default: long enough to walk through the home, short enough to hold attention. Stay under 90 seconds if you might boost it, because Instagram won't boost a reel that's longer. For your website or YouTube, a 16:9 tour of 10 to 15 photos gives buyers the full layout.
The platforms themselves allow much more. Instagram reels can run up to 20 minutes, but reels over 3 minutes aren't recommended to people who don't follow you. A listing video from photos never needs to be that long.
Rights and rules to check before you post
A video made from listing photos is still listing advertising, and the photos and music belong to someone. This is general information, not legal advice, and your MLS and state rules decide the details.
The photos. The photographer owns the copyright to photos they take unless they've assigned it in writing, according to NAR. A video is a derivative work of the photos, so check that your license covers it. NAR's suggested license wording gives the real estate professional "the right to reproduce, create derivative works from, distribute, and publicly display" the photos. Older or informal agreements may not say that.
Photos from an earlier listing. Photos from the last time the home was listed belong to whoever owns or licensed them then, not to the house. Houston's MLS, for one, doesn't let one member reuse another's listing content on a later listing without written authorization from its owner or licensor.
Someone else's listing. Don't make a video of another broker's listing without their permission. NAR's model MLS rules say a listing can't be advertised by anyone but the listing broker without that broker's consent, and NAR's Code of Ethics guidance gives the same answer for social media.
Your firm name and claims. Show your firm's name, and your license number where your state requires it. Under NAR's standards, only the listing or cooperating broker in the deal may claim a home was "sold", and misleading images are ruled out, so label virtually staged or edited photos.
Your MLS. Rules on video in the MLS itself vary. Connecticut's SmartMLS accepts only unbranded videos, while Houston's allows the listing firm's name but not agent photos, logos or contact details. If you're uploading the video to your MLS, check its rules and make a version without your end card if needed.
Boosting the video. Paying to promote a listing reel makes it a housing ad. In the US, Meta requires you to choose the housing Special Ad Category, which limits or removes targeting by age, gender and ZIP code. A boosted Instagram reel also has to be 90 seconds or less, 9:16 and free of licensed music.
For Fair Housing wording, state disclosure rules and AI-edited photos, see our real estate social media compliance guide.
Where to post your listing video
| Where | Shape | Notes |
|---|---|---|
| 9:16 | Posts as a reel. Needs a professional account to publish from a tool. | |
| Facebook Page | 9:16 or 16:9 | Vertical shows as a reel; landscape plays in the feed. |
| TikTok | 9:16 | Post directly, or send it to your TikTok inbox to finish in the app. |
| Threads | 9:16 | Keep the caption short and conversational. |
| Website, email, MLS | 16:9 | Check whether your MLS wants it unbranded. |
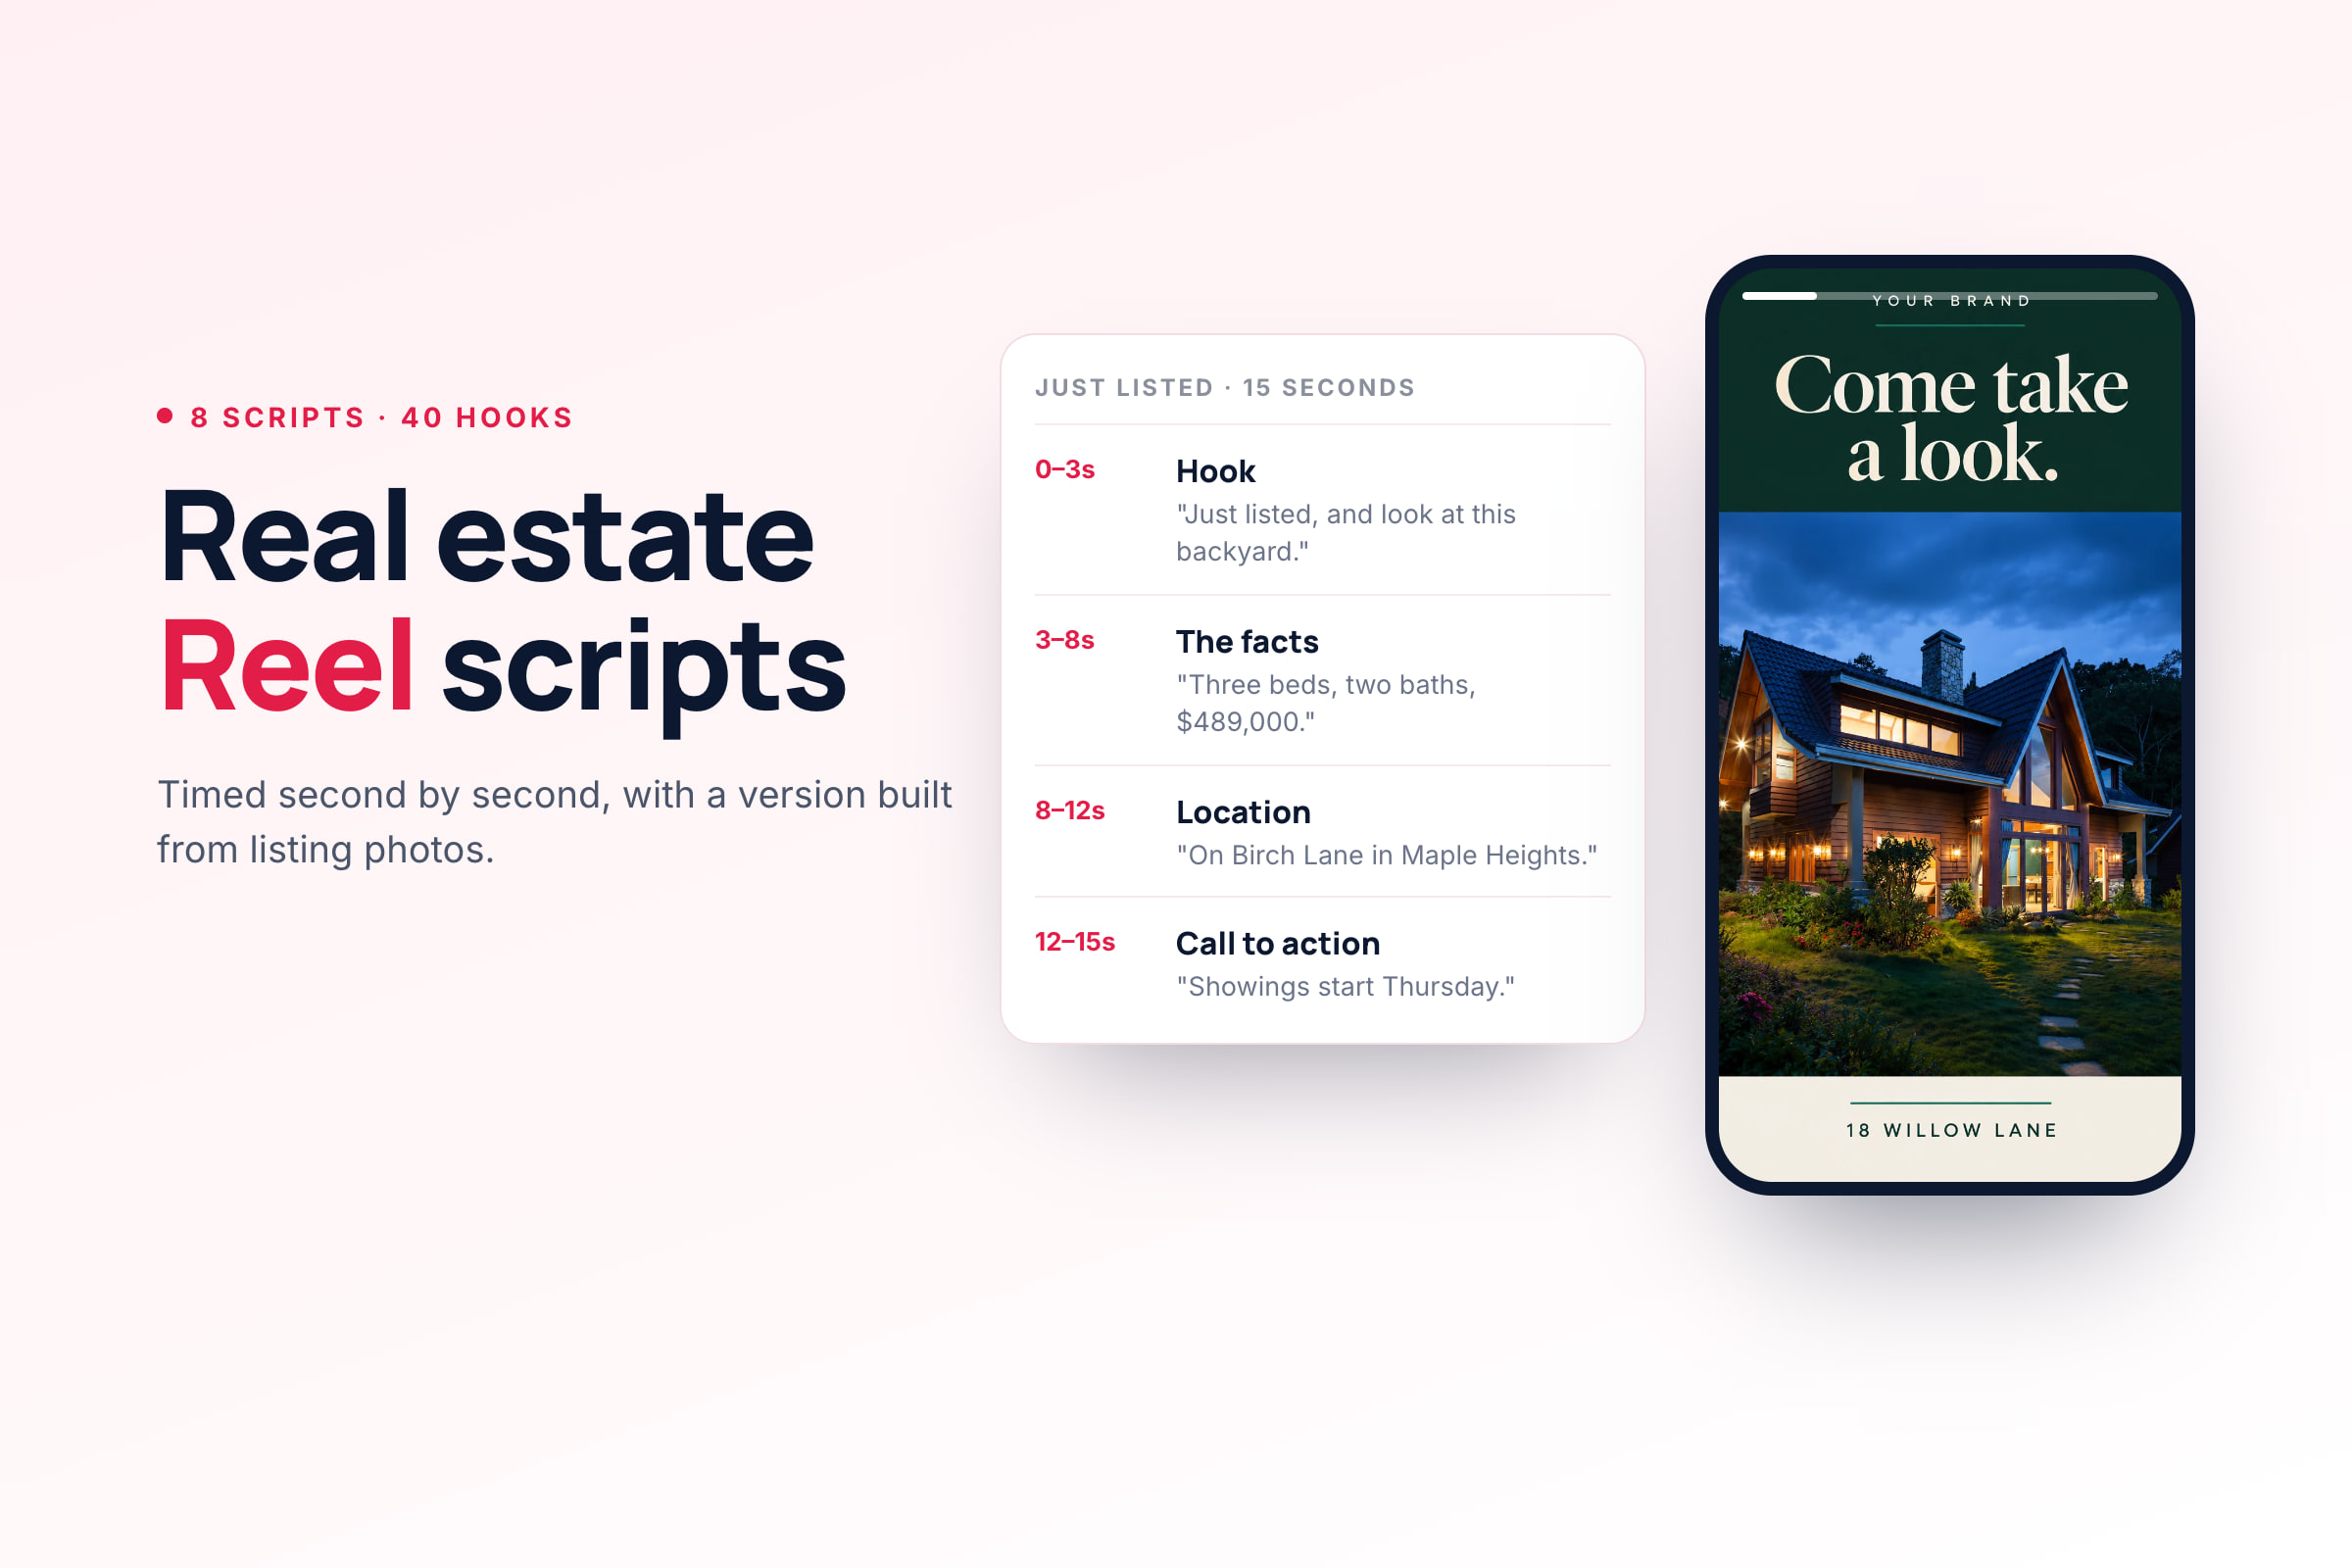
Post the vertical version the day the listing goes live, then reuse the same photos for the next stage: an open house version with the date and time on the opening shot, or a just-sold version once the deal closes. For scripts and hooks to build around your photos, see our real estate reel scripts.
Make a listing video in Velisto
Velisto makes branded 9:16 reels and 16:9 videos from photos, and schedules them to Instagram, Facebook, TikTok and Threads. There are two ways in: from a listing, when you want the video and captions made for you, and from any photos, when you want full control or have no listing.
Set your look once. In Settings → Workspace → Content packs, an Owner or Admin can choose a Reel design, the branded overlay a new listing reel starts with, and Default music. Pick an overlay whose cover shows the price, address, beds and baths. Without an overlay, a video is photos and music only, with no end card.
From a listing
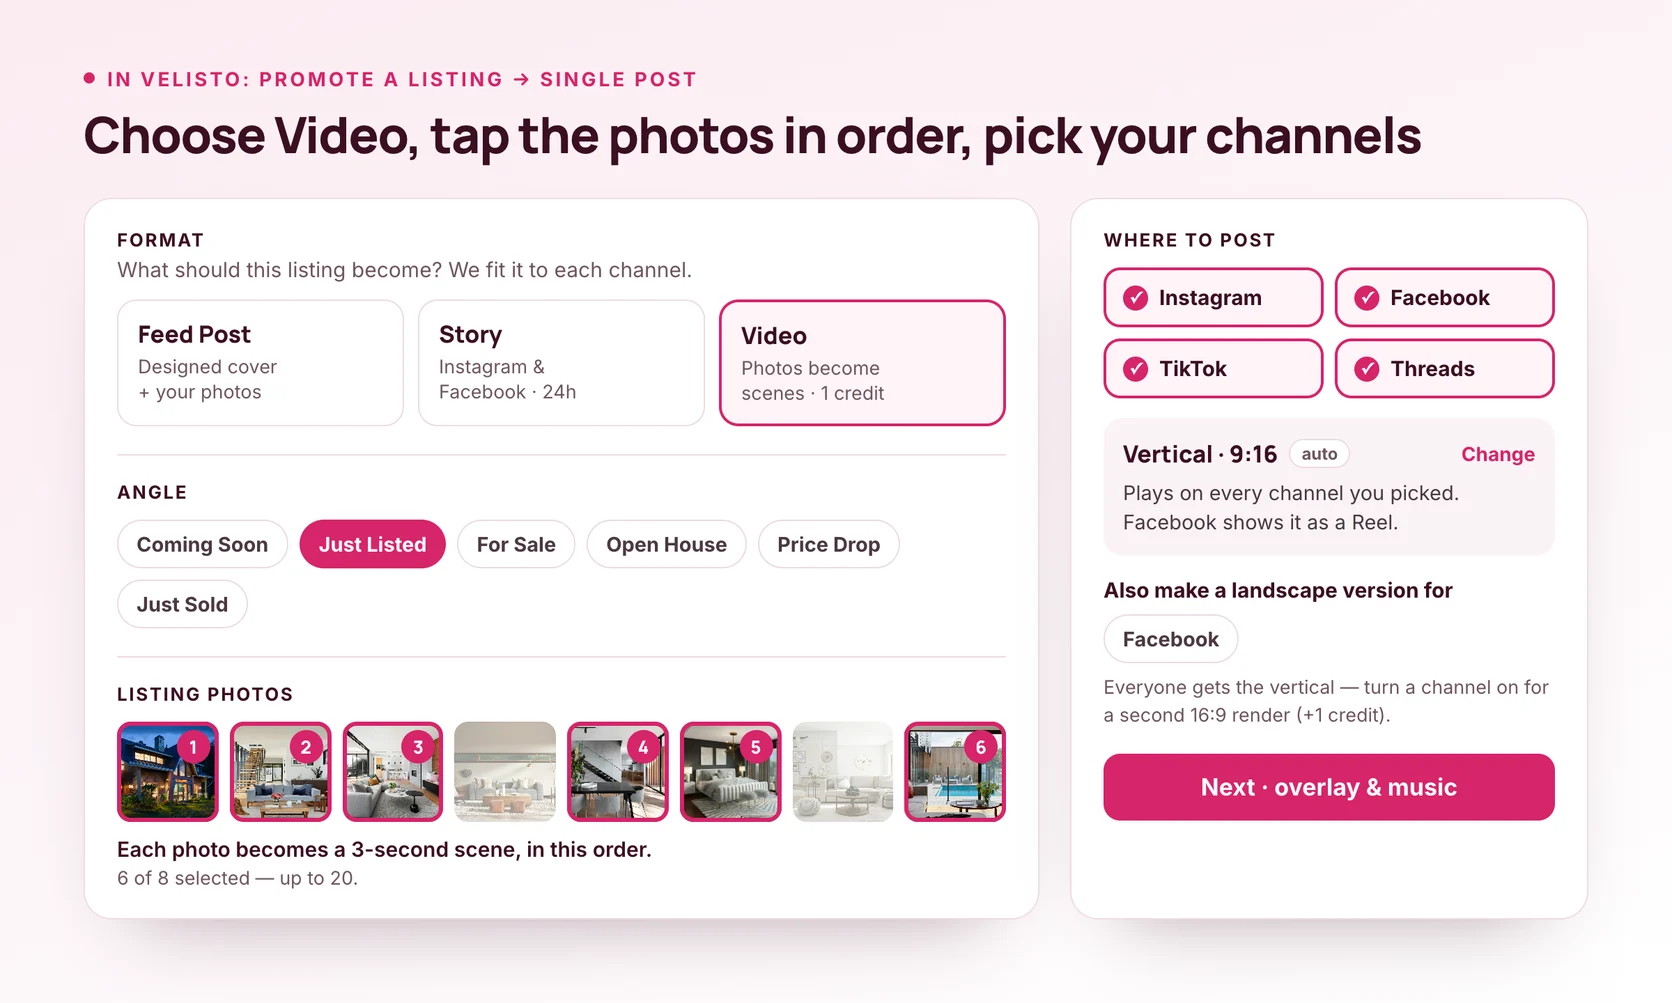
- Open Create → Promote a listing, keep Single post, and choose the listing. You can also bring one in from its web page with Import from URL.
- Under Format, choose Video, then pick an angle, such as Just Listed, Open House or Price Drop.
- Tap the photos in the order you want them. The numbers become the scene order, and a reel uses the first 10 (a landscape video, 15).
- Under Where to post, pick your channels. Velisto picks the shape from them. If you mix Instagram with Facebook, it also makes a landscape version for Facebook, which uses a second render. Turn it off under Also make a landscape version for to post the vertical video everywhere; Facebook shows it as a Reel.
- Choose Next · overlay & music. Check the scene order, choose the overlay and music, and read every line under Overlay text.
- Choose Generate video. Velisto renders the video and writes a caption for each channel, then opens the post.
- Review each channel's caption, add a first comment if you like, and choose Schedule once the video is ready.
From any photos
- Go to Content → Create → Start fresh, and choose Reel (9:16) or Video from photos (16:9).
- Choose Pick a listing to bring in a listing's photos and details, or Add scenes to pick photos from your media library, for a neighborhood or community video.
- Drag the scenes into order. Select a scene to set its Duration, its Motion (Ken Burns in or out, or a pan) and its Fit: Crop to fill, or Fit · blurred bg for a photo that crops badly.
- Choose an overlay, pick your music, and edit the Overlay text. The Intro card switch decides whether the video opens on the branded cover or straight on your photos.
- Choose Create video. When it's ready, Download it or choose Add to a post → to write the caption and schedule it.
Listing campaigns can include a video too. Turn on Reels in campaigns in Content packs, and each campaign offers a Listing reel to schedule alongside the other posts. Open its Video settings to choose the overlay and music.
Video is one part of the real estate content creation tool: the same workspace makes listing posts, captions in your voice and everyday content.
You review and approve the content; Velisto publishes it at the scheduled time. Each video uses one render: Solo includes 30 a month, Team 150 and Brokerage 500, and the 7-day free trial includes 20. See how the real estate video maker works, or start a free trial.
Listing video FAQ
How many photos do I need for a listing video? Six to ten for a vertical reel, and up to fifteen for a landscape tour. At three seconds a photo, six photos make about an 18-second reel. Start with your strongest shot and cut near-duplicates.
How long should a listing video be? About 15 to 30 seconds for Reels and TikTok, which is six to ten photos. Keep it under 90 seconds if you might boost it on Instagram. A landscape tour for your website can run longer.
Can I use my listing photos in a video? Usually, but check your photographer's license first. The photographer owns the copyright unless it was assigned in writing, and a video is a derivative work. NAR's suggested license wording covers derivative works; older or informal agreements may not.
Can I make a video of another agent's listing? Not without the listing broker's permission. NAR's model MLS rules and its Code of Ethics guidance both say only the listing broker may advertise a listing unless they consent.
What music can I use in a real estate video? Music licensed for commercial use, or the platform's commercial audio: Instagram's Sound Collection, or TikTok's Commercial Sounds. Trending songs from the general libraries are meant for personal use, and a business post that uses them can be muted or removed.
Can I turn landscape photos into a vertical video? Yes. Each photo is cropped to fill the 9:16 frame, which keeps about 40% of its width, so pick photos with the subject near the middle. For a photo that crops badly, show it whole over a blurred background.
For where video fits in your wider plan, read our real estate social media marketing guide.
Turn listing photos into branded reels in Velisto, and review every video before it's scheduled. Get started.