
CREATE BRANDED VIDEOS

How to turn your photos
into a branded video.

Create a reel or a landscape video without filming. Arrange your photos, choose the look and music, then review a finished video you can share.

Explore the app preview. Video walkthrough coming soon.

The short versionBring your photos. Shape the scenes. Add branding and music, then create the video.

5 practical steps

A LITTLE PREPARATION

Before you begin.

  • Photos with a clear story

    Use a listing’s images or your own photos. Lead with a strong view, then show the details that deserve a closer look.

  • Your branding

    Have the correct logo, agent details and any property text ready for the overlay.

  • A format and a purpose

    Decide where the video will be shared and what you want someone to do after watching.

01

Choose the format and your starting photos.

Open a reel or landscape video in the Reels & Video Editor. Use vertical 9:16 for a full-screen reel, or landscape 16:9 for a wider property tour.

Bring in a listing’s photos and details, or add your own images. You can make a video about a neighborhood, an introduction or another topic without selecting a listing.

Start with the destination.

Choose the format before refining the crop. A wide room photograph needs a different framing in a vertical reel.

02

Arrange the scenes and set the pace.

Put the photos in the order you want people to see them. Select a scene to adjust its Duration, motion and Fit.

Use Crop to fill for a full-frame image, or Fit · blurred background when you want to keep the whole photo visible. Check that an important room feature is not cropped out.
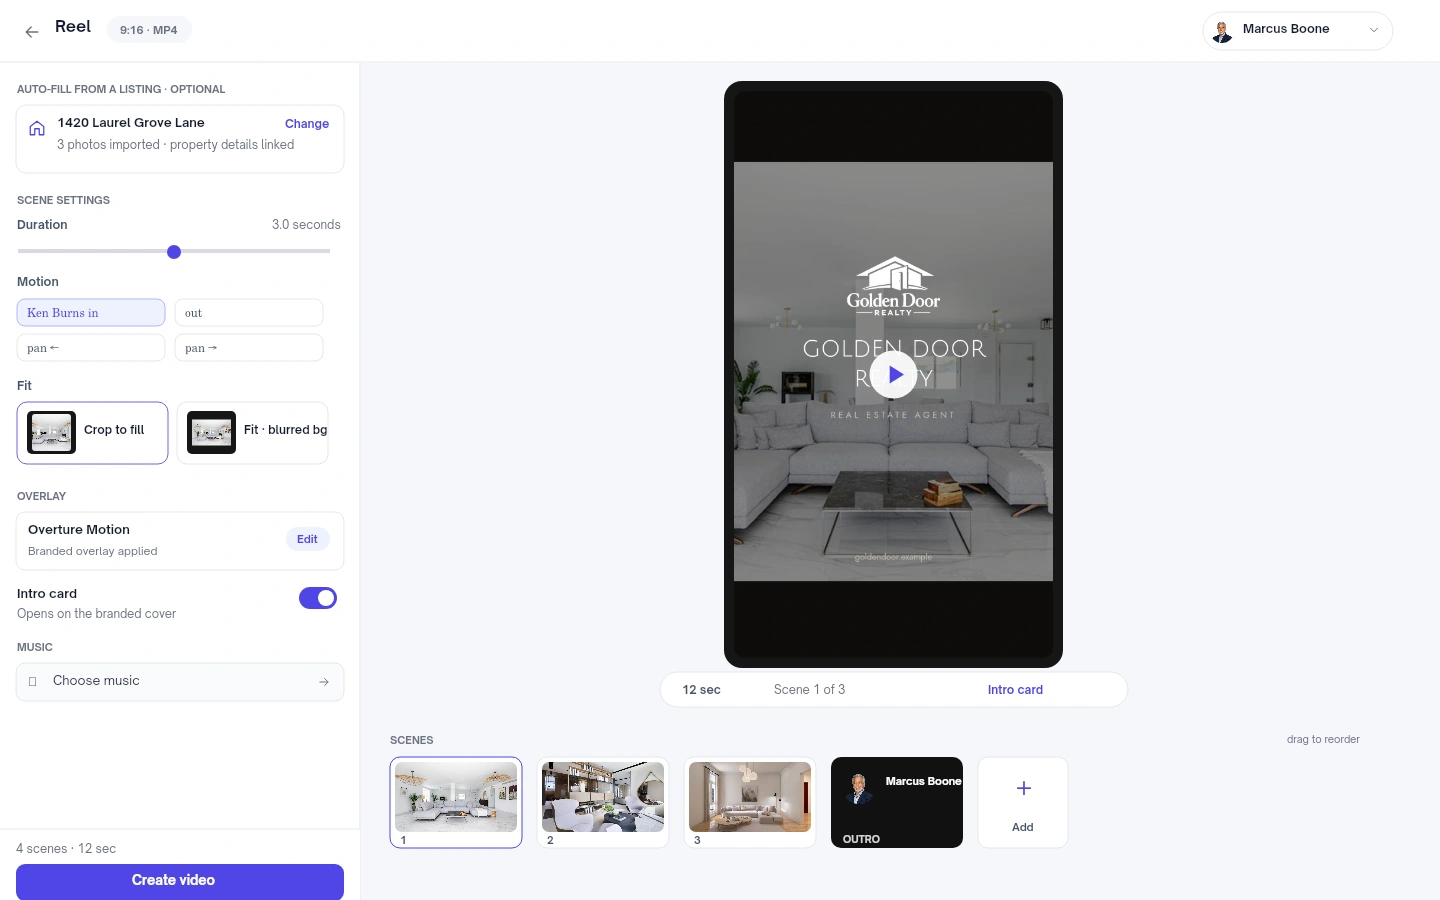
Overture video editor preview with an ordered photo scene strip and settings panelEnlarge preview
The editor preview uses Velisto’s app layout with a fictional property and agent.
03

Add the branded look and music.

Choose an overlay and fill its editable text. Check the agent name, contact information and any listing price or address shown on screen.

Select a music track and adjust the volume. Preview the sequence with the soundtrack so the pace feels right. The examples below use Overture in both formats.

Watch the text as well as the photos.

Make sure the words stay readable over every scene and the contact information is easy to catch.

04

Create the video and review the result.

Check the scene count and total duration, then choose Create video. The editor shows any missing photo or content requirements before you can continue.

Rendering runs in the background. When the video is ready, play it all the way through and listen to the music. Check the opening, transitions and final frame.

Check before starting another render.

Creating a new video uses your available render allowance. Finish changes to photos, text and timing before generating a new version.

05

Download it or add it to a post.

Use Download when you need the video file, or Add to a post to open the composer with the rendered video attached.

Review the caption, select compatible connected channels and choose when to publish. Rendering a video does not publish it automatically.

SEE THE RESULT

Watch the finished videos.

The same sample property, presented in two formats. Play each Overture example to see the scenes, branding and music together.

OVERTURE · 9:16

A vertical reel.

A full-screen sequence with your photos, branded overlay and music.

OVERTURE · 16:9

A landscape property tour.

A wider presentation of the same property, with the framing reviewed for landscape.

Both examples include music and fictional property and agent details.

Next: the final checks

ONE LAST LOOK

Four things to check
before you finish.

Review the details that make this piece ready for its audience.

The right framing

Review the important parts of every photo in the chosen aspect ratio.

Readable branding

Check the overlay text, logo and contact details throughout the video.

Pace and sound

Watch the complete sequence and listen to the soundtrack.

The publishing plan

Confirm the channel, caption and timing when you add the video to a post.

YOUR QUESTIONS, ANSWERED

A few questions
before you get started.

Practical answers for this part of your workflow.

Visit the FAQ hub
Do I need to film myself?
No. This workflow creates a video from photos, with scene motion, branding and music.
Can I make videos without a listing?
Yes. Add your own images for local content, introductions and other marketing. Listing autofill is optional.
Can I make both vertical and landscape versions?
Yes. Work in the appropriate format and review its framing before rendering. Each new render uses your available allowance.
Can I change the music and scene timing?
Yes. Choose the track and volume, and adjust individual scenes’ duration, motion and image fit in the editor.
Does Create video publish the result?
No. Review the rendered video, then download it or use Add to a post to continue in the composer.
Can I use a different template?
Yes. Choose an available overlay that fits your content. Overture is the real template used for the examples in this guide.

MAKE YOUR NEXT STEP EASIER

Your photos have a story.
Give them a little motion.

Create a branded reel or property tour from the images you already have.

Product preview

See Velisto in action

Demo video coming soon

This space is ready for the Velisto product tour.

Explore how Velisto works